Split testing is important. Really important. It’s the single most neglected discipline (just ahead of user experience) within the search industry, yet so many practitioners seem nervous to get started.
SEO professionals, small business owners, and even so-called digital marketing consultants all have a lot of excuses about why they aren’t testing. These excuses range from the logical to the ridiculous, but tend to fall into one of two categories:
- They fear it is too technical.
- They don’t understand the process value, and hence don’t want to spend the money.
The good news is, it’s not as technical as you might think, and there is a way to get started for free.
3 Reasons You Need to Split Test
- Little changes can lead to big improvements.
- Your competitors are testing. If you aren’t gaining ground, you’re losing it.
- It is a tenet of the Lean Startup for good cause, this is the quickest way to optimize conversions for your target audience.
Here’s What We’re Going to Do
The easiest way to get started with a simple split test is to make a copy of the page you would like to test.
Once the copy has been made – in most cases this involves create a new page in your content management system (CMS) and copying and pasting all of the source code from the original page – simply make the change that you would like to test and save the new page to a new URL.
When testing between two or more URLs, it’s smart to use the URLs as an additional indicator of the variation number, so the first variation would be URL-2, and the next URL-3.
Google Content Experiments
Google Content Experiments is a free and robust testing platform integrated directly into Google Analytics, formerly know as Google Website Optimizer. Among its highlights:
- Advanced segments
- A single control script
- Traffic allocation
- An improved statistical engine
- Regular expressions filters
Yes, this probably all sounds pretty technical for the average website owner. The goal here is to, in the simplest language, walk you through how to set up, manage, and analyze an experiment.
Getting Started
Before you can even consider getting started with your experiment, you have to get a few of your ducks in a row:
- Identify which page you want to test.
- Identify which element you’re going to test; headline, call to action, supporting content, etc.
- Create your hypothesis, or in plain language, decide what your goal is. It’s important to know what you’re aiming for before you decide to shoot. For example, if you want to increase your sales, set a realistic goal, like 5 percent.
- Create a copy of your original page and make the change you’ll be testing.
- Familiarize yourself with these 8 rules of A/B testing.
Setting Up Your First Content Experiment
In order to start your test, you first need to get into the testing tool.
Log into your Google Analytics account, and using the left-side navigation bar, navigate to Content > Experiments, you’ll see this:
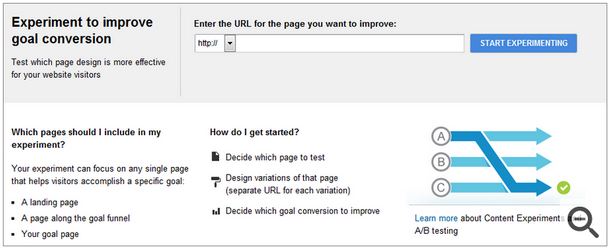
You should be able to fly through the setup pretty quickly. Once you’re at the screen above, enter the URL for the page you want to improve to start the setup wizard.
This should be the URL for your control (or existing) page. Not the new version of the page but the original version. Once you have entered the URL, the wizard with generate a preview to confirm it is the correct version of the page. If everything looks good click START EXPERIMENTING.
This will bring you into the Experiment Creation Wizard.
Step 1: Choose the Experiment Pages
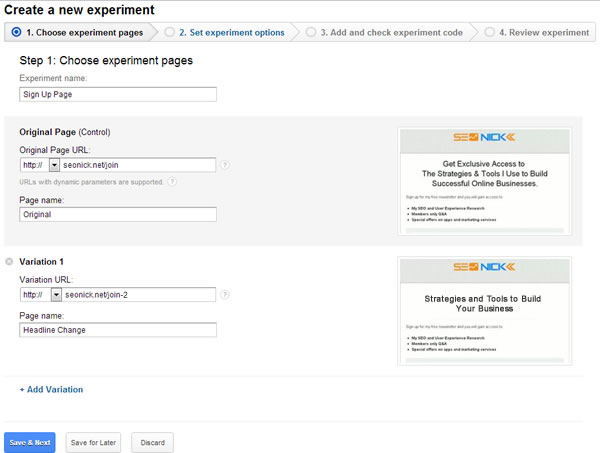
Your original (control) page will be automatically populated, so all you need to do is fill in the URL for your Variation 1 (reference above image).
Step 2: Set Up Your Experiment Options
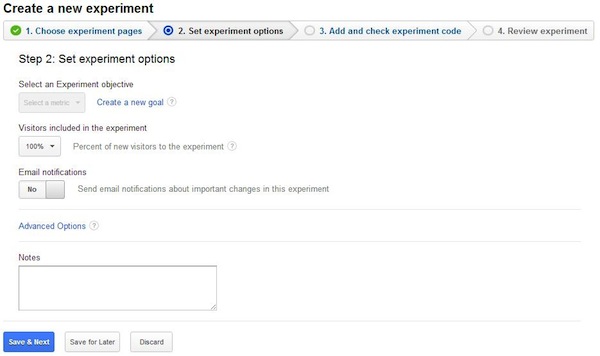
If you haven’t yet created your conversion goal (the action you’re driving your visitors to take) you need to do that now.
Click on the link to ‘Create a new goal’ and you’ll be taken to this screen:

Click +Goal and you’ll be able to create the conversion point here:

Give your goal a name and choose the type.
URL Destination is probably the easiest and most effective for your first split test, as most often the goal will be to increase sign-ups or click-through to another page.
Note: you must have a destination page in order for this goal type to work. This could be anything from the next step in your conversion funnel to a thank you page.
If you’re going to use URL Destination, upon selecting the radio button you’ll see this screen:

Click ‘Save and return’ and the Experiment wizard will automatically take you back to your options screen, where you need to choose the amount of traffic to include in your experiment, ranging anywhere from 1 to 100 percent. If your original URL receives less than 1,000 visitors per month, choose a high percentage of your traffic for the test – 75 to 100 percent.
You’ll also notice on the options screen there is a link for Advanced Options, which when clicked will slide open this view:

Consolidating the content for reporting purposes just means that Google Analytics will show an aggregate measure for all traffic to both variations. The testing dashboard will still show you the detailed traffic figures for both variations, but for general reporting purposes, the traffic measured to the page will be the sum of traffic to both page variations.
You’re also given the options to set the time period for the experiment, from as little as 3 days to as much as 2 weeks. For lower traffic sites, the longer the better.
Lastly, you can set your confidence interval, which is the measure of how statistically significant your sample is, or in plain language, the probability that the results will hold up. Some testing platforms let you go down to 90 percent, but Google Content Experiments only offers 95, 99, and 99.5 percent.
Step 3: Add and Verify Experiment Code
Here’s where people usually begin to get scared. Again, this isn’t as difficult as it might seem.
If it’s simply too scary for you, Google has gotten smart and allows you to send an email with the snippet and specific instructions to someone more code-savvy than yourself.
To insert the code yourself, all you need to do is add the auto-generated snippet created for you at this step to the top of the < head> tag on the original page.
Many content management systems, including WordPress, make it easy to jump into your header file and quickly copy and paste your code right after the opening tag. Furthermore, if you’re a WordPress user, there is a free plugin which makes is really easy.
Step 4: Launch Experiment
If you inserted your code correctly (remember, you only need to place it on your original page), you’ll see this review page:
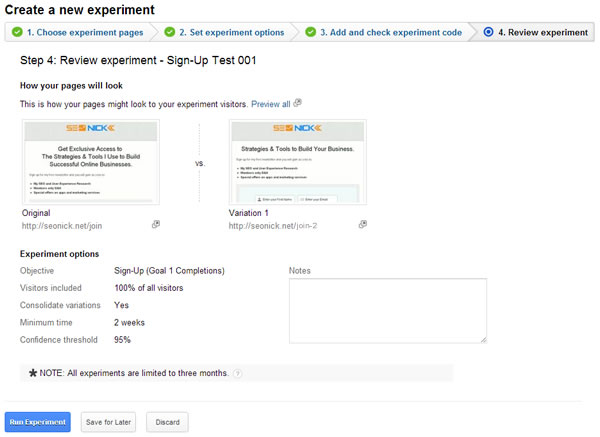
And that’s it! All that’s left to do now is click Run Experiment and you’re off to the races.

Monitor Your Test
Once your test is up and running, clicking the Experiments link within the left-side navigation will now navigate you to your testing dashboard, which immediately after launching your test will look like this:
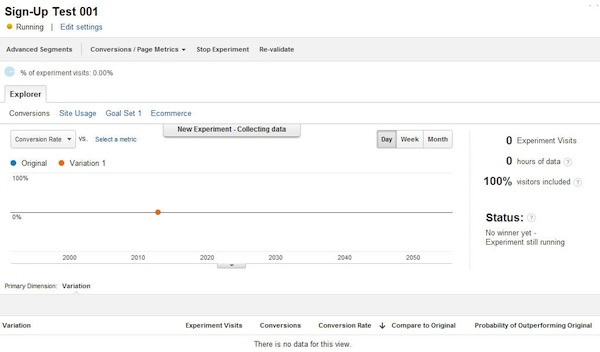
Open the experiment list to see:
- Important notifications about your experiments
- Which experiments are running
- Whether an experiment produced a winning page
- What date the experiment started
- What date the experiment ended
You can create new experiments from this page, as well as search your existing experiments.
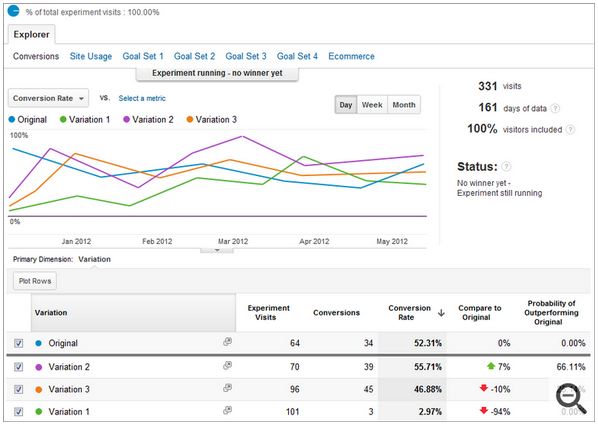
As data begins to come in, and depending on the number of test variations you are running, you’ll begin to see the line graphs populate to reflect performance:
Driving Traffic to Your Test Pages
If your website isn’t receiving enough traffic to quickly gather the testing results needed to achieve statistical significance, there are a few ways you can turbo charge your traffic for even a short period of time to push some tests through to completion.
*Note: When sharing, it’s important that you use the link to your original page. Google Content Experiments will take care of redirecting traffic based on the specific segmentation settings you specified in your experiment.
Hit Your Email List
This is exactly why you spent so much time building your email list. Leverage the opinion and behaviors of your subscribers to help you complete your test. Chances are your subscribers are either existing customers or are well within your target audience, they are ideal for testing participants.
Promote Through Social Media
Share that you’re testing. It isn’t uncommon and due to the structure of split testing, your visitors will not know which page is the control vs. the hypothesis, so while this isn’t double-blind, you are still working toward achieving a statistically significant sample.
To take this one step further, spend a few dollars on Facebook to drive some highly targeted traffic through your test pages, to get your new variation in front of some fresh eyes within your target demographic.
AdWords
There really is no faster way to turbo charge a test than to pay for some traffic. But instead of using a traffic delivery service, where the visitors are far from targeted, spend that money on running a few ads.
Take your time to really craft the message of your ad copy so your test pages are logical landing pages for your campaign. Don’t be afraid to bid high on some terms either, remember, this is a short-term strategy to help you improve your overall conversion rate.
Quantifying Your Results & Analyzing the Winner
It’s nice to know how long a test is going to run before you even get started. While this isn’t an exact science, if you have some baseline metrics, like your average conversion rate and approximate website traffic, you can gain some useful insights from using a test duration calculator. This will let you know about how long you’ll need to run the test for based on your confidence interval.
Once your test has completed, and achieved statistical significance (in plain language, once there is enough data to prove that the results are based on a pattern versus chance) it’s time to analyze the results.
Some Many tests fail, so don’t get discouraged if your first test doesn’t work out the way you hoped. It’s more important to take away some insights and use your experience to inform your next test.
Pay attention to specific elements of your tests, like:
- The source of visits, for both conversions and bounces.
- The sources that contribute to the most conversions per variation. Look for patterns in behavior from referral sources or search engines.
- Bounce paths; if visitors are leaving without converting, where are they going? (if still on your website).
Start Your Next Test
Now that you’ve got the ball rolling, don’t stop. One of the greatest current benefits of Google Content Experiments is that it’s free.
Now that you know how to create A/B tests, build a schedule for testing; taking into consideration new tests and changes to existing tests. Based on your average test duration, start projecting how many tests you’ll be able to complete in the next month, quarter, and so forth.
If you get stuck on inspiration for what to test, check out this post on using reference cases to help inspire new test designs.


