Event tracking is one of the most useful features in Google Analytics.
With just a little bit of extra code, you can capture all kinds of information about how people behave on your site.
Event tracking lets you monitor just about any action that doesn’t trigger a new page to load, such as watching a video or clicking on an outbound link. This data can be invaluable in improving your site.
There are two different ways you can set up event tracking in Google Analytics. One way is to add the code manually. The other is to set up tracking through Google Tag Manager.
Both methods are doable without a developer, although you may find it easier to use Google Tag Manager if you have no coding experience.
How to set up event tracking manually
What exactly is an event? Before you start tracking events, it’s important to understand how they’re put together. Each event is made up of four components that you define. These are category, action, label, and value.
Category
A category is an overall group of events. You can create more than one type of event to track in the same category “basket.”
For instance, you could create a category called Downloads to group a number of different events involving various downloads from your site.
Action
An event’s action describes the particular action that the event is set up to track. If you’re tracking downloads of a PDF file, for instance, you might call your event’s action Download PDF.
Label
Your label provides more information about the action taken. For instance, if you have several PDFs available for download on your site, you can keep track of how many people download each one by labeling each separate event with the PDF’s title.
A label is optional, but it’s almost always a good idea to use one.
Value
Value is an optional component that lets you track a numerical value associated with an event. Unlike the first three components, which are made up of text, value is always an integer.
For instance, if you wanted to keep track of a video’s load time, you would use the value component to do so. If you don’t need to keep track of anything numerical, it’s fine to leave this component out of your event.
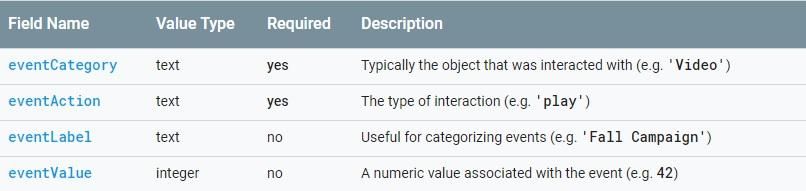
A table of the four components of an event. Source: Google Analytics
Step one: Decide how to structure your reports
Before you dive into tracking your events, come up with a plan for how you want your data to be organized. Decide which categories, actions, and labels you’ll use, and choose a clear and consistent naming pattern for them.
Remember, if you decide to change the structure of your event tracking later, your data won’t be reorganized retroactively. A little thought and planning up front can save you a lot of hassle down the road.
Step two: Connect your site to Google Analytics
If you haven’t done so already, set up a Google Analytics property and get your tracking ID. You can find your tracking ID by going to the admin section of your GA account and navigating to the property you want to track.
Once you have your ID, add the following snippet right after the <head> tag of each page:
<!-- Global Site Tag (gtag.js) - Google Analytics -->

<script async src="https://www.googletagmanager.com/gtag/js?id=GA_TRACKING_ID"></script>

<script>

window.dataLayer = window.dataLayer || [];

function gtag(){dataLayer.push(arguments);}

gtag('js', new Date());
gtag('config', 'GA_TRACKING_ID');

</script>
This code snippet enables Google Analytics to track events on your site. Replace GA_TRACKING_ID with your own tracking ID. Source: Analytics Help
Step three: Add code snippets to elements you want to track
Here is the format for an event tracking code snippet:
ga('send', 'event', [eventCategory], [eventAction], [eventLabel], [eventValue], [fieldsObject]);
After filling in the information that defines the event you want to track, add this snippet to the relevant element on your webpage. You’ll need to use something called an event handler to do so.
An event handler is a HTML term that triggers your tracking code to fire when a specific action is completed. For instance, if you wanted to track how many times visitors clicked on a button, you would use the onclick event handler and your code would look like this:
<button onclick="ga('send', 'event', [eventCategory], [eventAction], [eventLabel], [eventValue], [fieldsObject]);">Example Button Text</button>
You can find a list of common event handlers, as well as a more in-depth explanation on how they work, here.
Step four: Verify that your code is working
Once you’ve added event tracking code to your page, the final step is to make sure it’s working. The simplest way to do this is to trigger the event yourself. Then, check Google Analytics to see if the event showed up.
You can view your tracked events by clicking “Behavior” in the sidebar and scrolling down to “Events.”

Your tracked events can be found under “Behavior” in Google Analytics.
How to set up event tracking with Google Tag Manager
Google Tag Manager can be a little tricky to navigate if you aren’t familiar with it. However, if you’ve never worked with code before, you might find tracking events with GTM easier than doing it manually.
If you have a large site or you want to track many different things, GTM can also help you scale your event tracking easily.
Step one: Enable built-in click variables
You’ll need GTM’s built-in click variables to create your tags and triggers, so start by making sure they are enabled. Select “Variables” in the sidebar and click the “Configure” button.
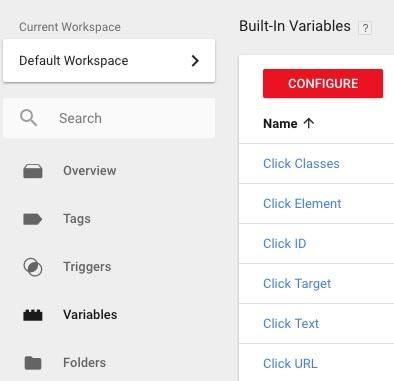
Enabling built-in click variables, step one
Then make sure all the click variables are checked.
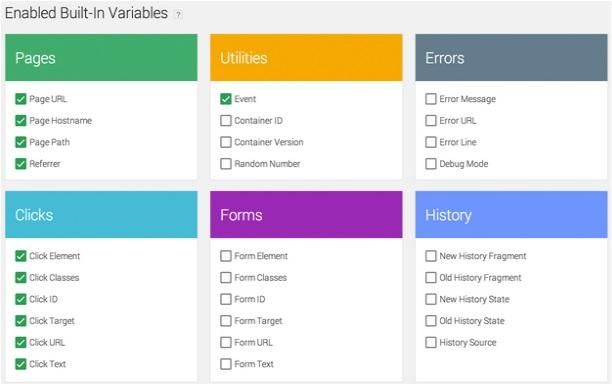
Enabling built-in click variables, step two. Source
Step two: Create a new tag for the event you want to track
Click “Tags” on the sidebar. Then click the “New” button. You’ll have the option to select your tag type. Choose “Universal Analytics.”
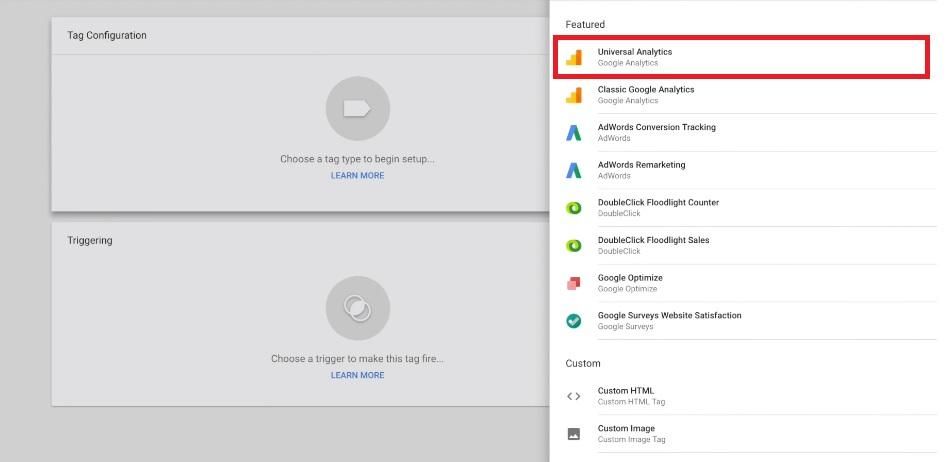
Creating a new tag in Google Tag Manager
Step three: Configure your tag
Set your new tag’s track type to “Event.” Fill in all the relevant information – category, action, label, etc. – in the fields that appear underneath, and click “Continue.”
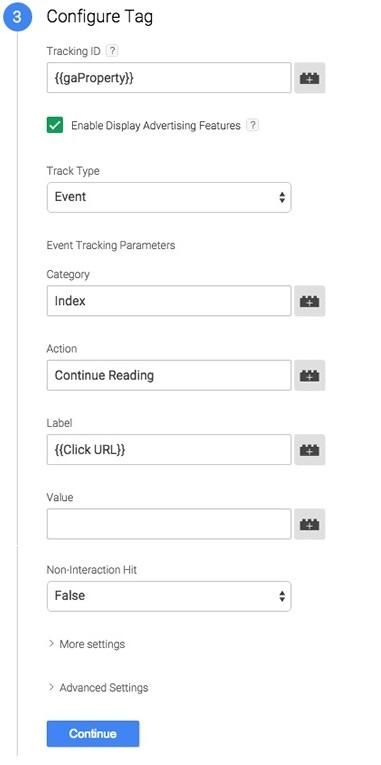
An example of how to configure a new tag in Google Tag Manager. Source: Analytics Help
Step four: Specify your trigger
Specify the trigger that will make your tag fire – for instance, a click. If you are creating a new trigger (as opposed to using one you’ve created in the past), you will need to configure it.
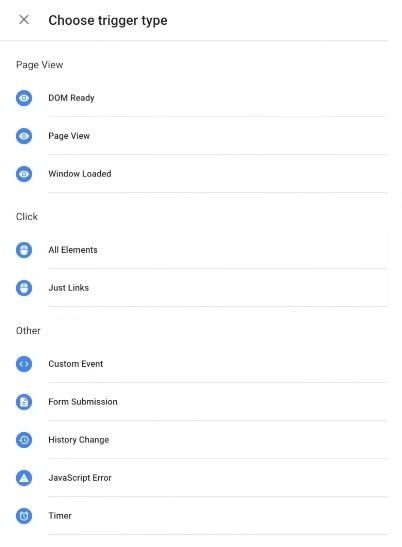
Types of triggers that you can choose in Google Tag Manager
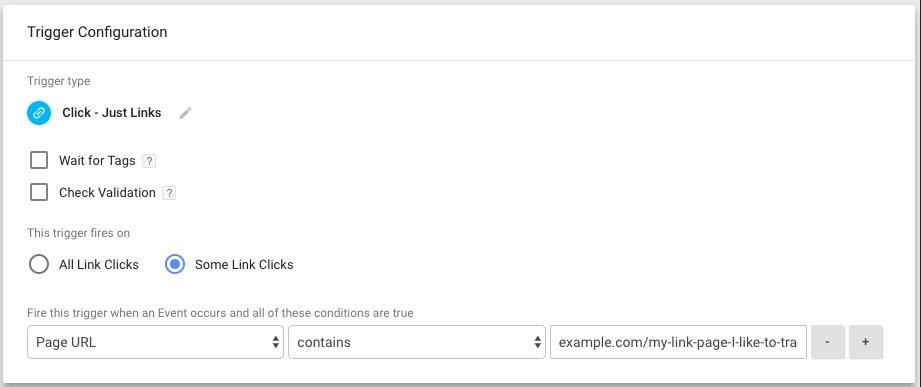
An example of how to configure a trigger. This one fires when a certain URL is clicked. Source: Johannes Mehlem
Step five: Save the finished tag
After you save your trigger, it should show up in your tag. Click “Save Tag” to complete the process.

A tag that is ready to go. Source: Analytics Help
The takeaway and extra resources
Event tracking is one of the most useful and versatile analytics techniques available – you can use it to monitor nearly anything you want. While this guide will get you started, there’s a lot more to know about event tracking with Google Analytics, so don’t be afraid to look for resources that will help you understand event tracking.
Courses like the 2018 Google Analytics Bootcamp on Udemy (which I used to help write this article) will give you a solid grounding in how to use Google Analytics and Google Tag Manager, so you’ll be able to proceed with confidence.
Leave a Reply
You must be logged in to post a comment.