Image optimization for SEO: Everything you need to know for success
Basic image optimization tips that anyone can apply for any type of site, even WordPress. Lots of facts, stats and screenshots included.
Basic image optimization tips that anyone can apply for any type of site, even WordPress. Lots of facts, stats and screenshots included.
As of January 2019, there are more than 1.94 billion websites. That’s a lot of competition. What’s one great way to stand out? Great images. In fact, vision dominates all other senses when it comes to interacting with and absorbing information.
Here are three quick facts to help you understand how critical images are for people (and for SEO):
With the majority of search volume coming from phones — and coupled with the fact that people’s attention spans have reduced to eight seconds — it’s essential for websites to be able to deliver a quick, frictionless, and delightful user experience.
Image optimization serves as a major part of this puzzle.
These are some tips that anyone can apply for any type of site (even WordPress), so you’re not solely at the mercy of your developers and designers.
Here’s a table that Google shared to help understand the pixel-to-byte relation. In short, you’ll get an idea of how heavy one image can get based on its dimensions.
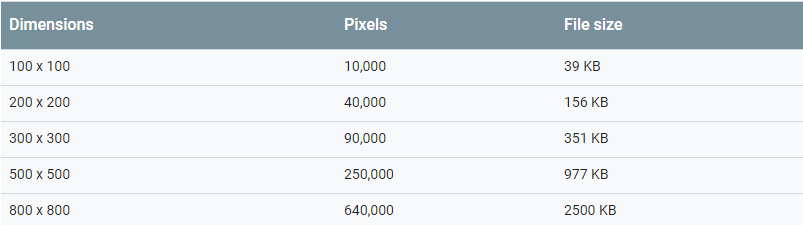
Source: Google
Google also mentioned that it takes four bytes of memory to deliver one pixel. Imagine if you had several images on a site with 800 X 800 pixels. our site would take at least something around 625 kBps. Or in simpler terms, imagine an elephant participating in a rabbit race.
I would suggest wisely using a mix of both. An ideal ratio could be 40% vector images and 60% raster images.
SVG is the only, and the best, option for vector images. Due to its flat imagery, you also benefit from high quality that is easily scalable.
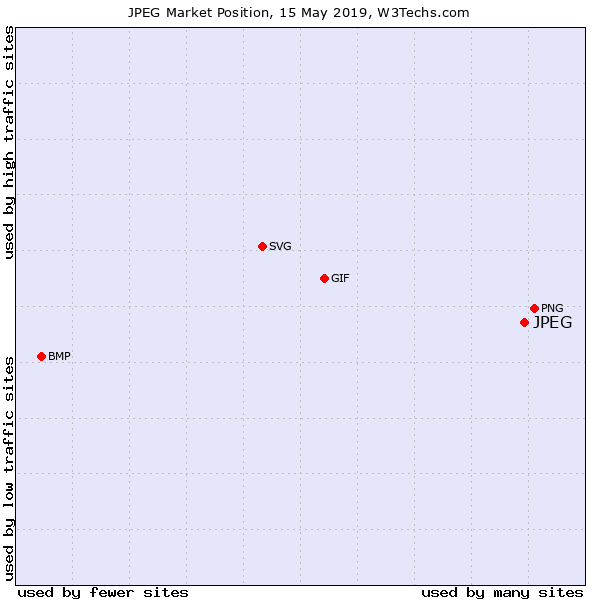
Source: W3Techs
Note: The data in the above chart is of May 15, 2019
With a cloud full of devices it’s obvious why people get confused about ideal image sizes.
Note that image size and image file size are two different things. Here we’ll explain how you can get ideal image size (also called image dimensions).
As part of image dimensions, we’ll also discuss aspect ratios.
Aspect ratios tell the width and height of an image and are written in an “x:y” format.
Remember the time when you tried scaling an image and literally blew it out of proportion? This is exactly what it saves you from. Referring to an image aspect ratio while cropping or resizing images helps you maintain the viability and beauty of the image’s dimensions.
You could refer to this image Shutterstock created to enlist some commonly used aspect ratios.
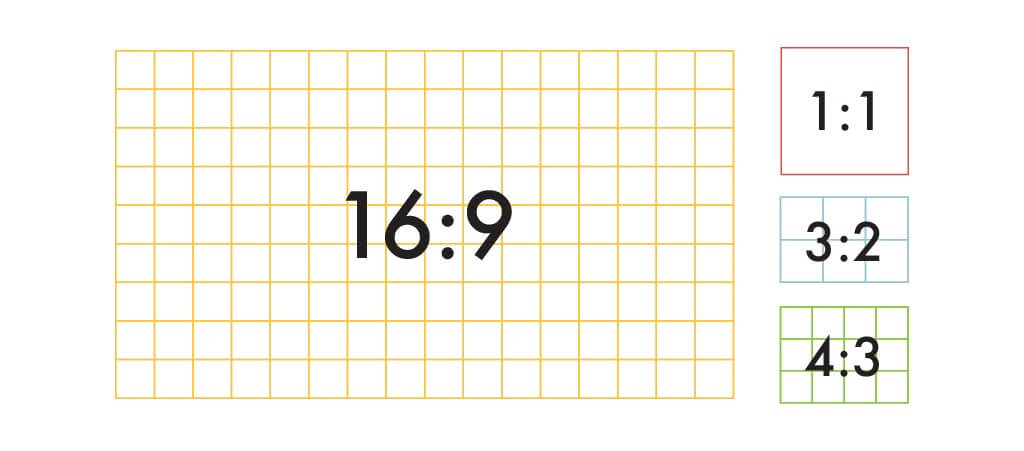
Source for the image and the table data: Shutterstock
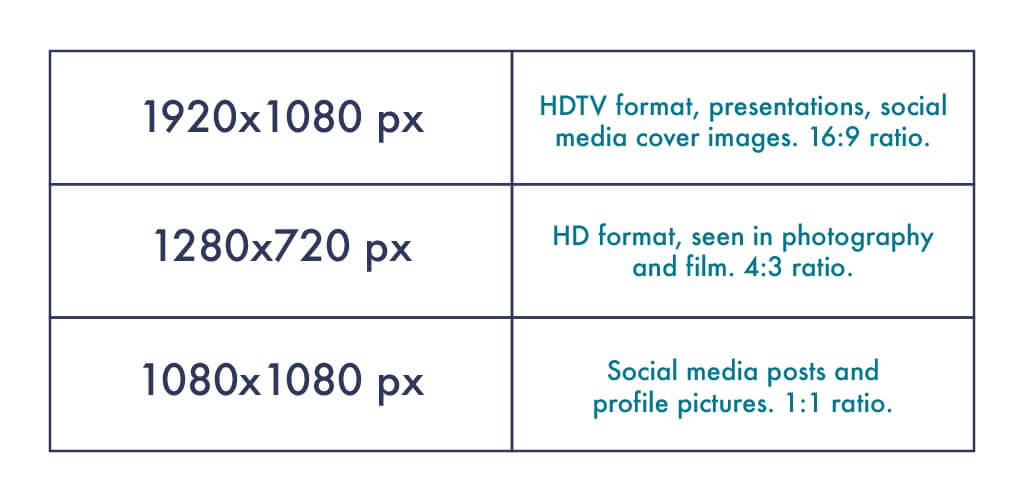
| Aspect ratio | Typical dimensions (inches) | Typical dimensions (pixels) | Ideal for |
| 1:1 | 8 x 8 | 1080 x 1080 | Social media profile photos and mobile screens |
| 3:2 | 6 x 4 | 1080 x 720 | Photography and print |
| 4:3 | 8 x 6 | 1024 x 768 pixels | TVs, monitors, and digital cameras |
| 16:9 | 1920 x 1080 and 1280 x 720 | Presentations, monitors, and widescreen TVs |
With reference to the table above, it’s best to focus on the 1:1 and 4:3 image ratio that are apt for social media, mobile screens, photography, and print.
You might have your own dimension templates based on the content management system (CMS) you’re using.
According to Squarespace, the most ideal size for image optimization on a CMS is 1500 and 2500 pixels.
Here’s a quick and simple answer to spot the most common image sizes for the web.
 Source: Shutterstock
From personal observation, I can suggest using 1080 X 1080 pixels and 1500 X 2500 pixels.
If you’re feeling too lazy to go through all these details, you could also try scaling the image from the corner arrow while you’ve pressed the “Shift” key. Works for some platforms.
Search engines have brains without eyes, so unless you name your images right, they won’t be able to “read” your images nor rank you accordingly. This is where your keywords come into play. As I’ve mentioned above, if you name your images well, you can improve your keyword density and chances of ranking.
Let’s explain this with an example:
Name your images in all small letters with hyphens in between and leave no spaces. As you’ve seen, I’ve used the keyword “image optimization” in the “five-tips-for-image-optimization” example. You’ll be surprised with how much that helps in ranking.
You could also use the following to improve keyword usage in your site content:
Plus, if you have an ecommerce site, you could even make good use of structured data to give the search engine more specific details about your products’ color, type, size, and a lot more.
Compressing a file is possibly the simplest yet the most crucial part of image optimization as it directly relates to the website’s loading time. Points one to four prepare you for this final stage of image optimization.
A file size below 70 kb is what you should be targeting. In case of heavy files closer to 300 kb, the best you can achieve is a 100 kb file size. Doing so saves your images from taking extra milliseconds to load while it gives you lossy, compressed images that do not compromise the visual quality.
All you need to do is drop these files on a file compression site and you’re all set. These are some good, free image file compression online tools:
You could be using all these image optimization tips and still get stuck with a site that loads in 13 seconds or even worse. This is when you might want to ask yourself:
Website content, both visual and written, has an intertwined relationship that stimulates emotions and inspires people to further engage with your product or service. People (or at least I) judge a business through its website so feel free to tell us, which was the last impressive website you visited? Or what have you done for image optimization?
Leave a Reply
You must be logged in to post a comment.